Measuring Threads
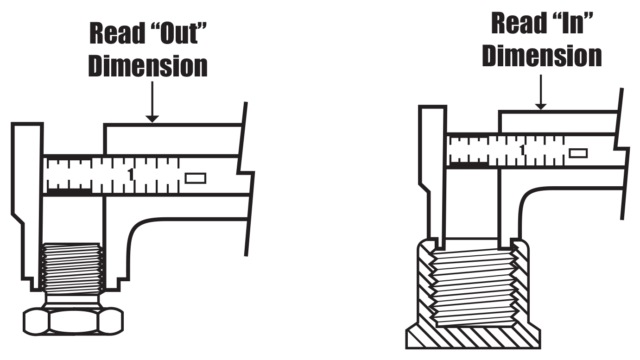
With the caliper, measure the thread diameter of the largest point. (Outside Diameter (O.D.) of male threads – Inside Diameter (I.D.) of female threads.)

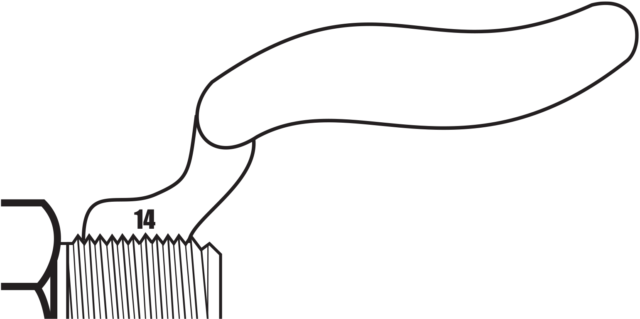
Using the thread gauge, determine the number of threads per inch. Comparison of gauge and coupling threads against a lighted background will ensure an accurate reading.

Match the measurements taken above against those in the following tables that appear similar to the coupling under consideration.
Measuring Seat Angles
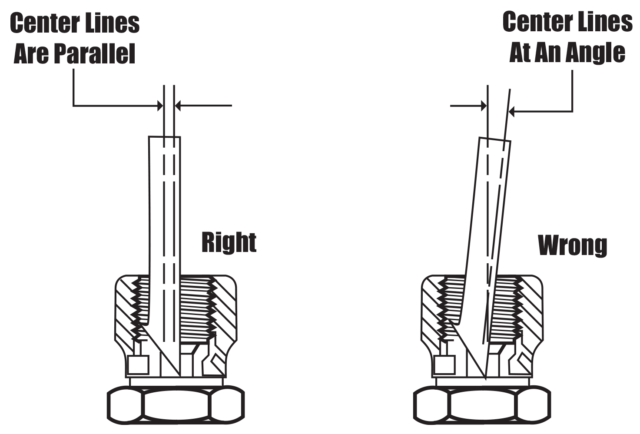
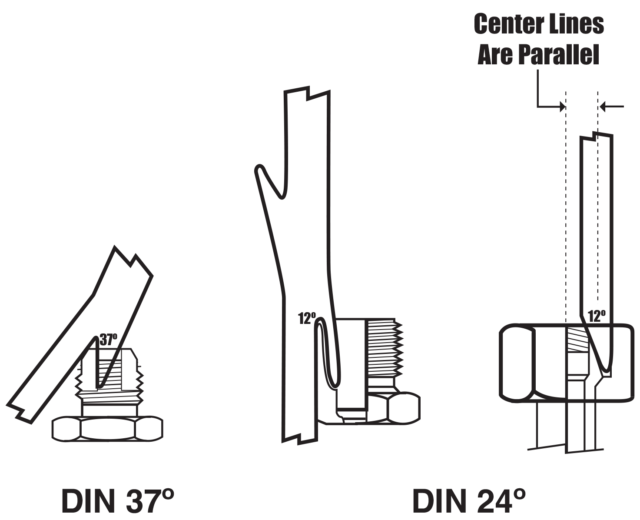
Using the seat gauge, determine the angle of the seat, as illustrated. When the centerline of the seat gauge extends parallel with the projected longitudinal axis of the coupling, the angles of the gauge and seat match.


Compare the measurements taken to a coupling shown in the following tables that appear to be similar.
NOTE: Thread binding will occur when different thread configurations are used. DO NOT mix thread configurations.
Thread Chart
| DASH SIZE | 2 | 3 | 4 | 5 | 6 | 7 | 8 | 10 | 12 | 14 | 16 | 20 | 24 | 32 | 40 | 48 |
|---|---|---|---|---|---|---|---|---|---|---|---|---|---|---|---|---|
| NPTF Pipe Thread | 1/8–27 | 1/4–18 | 3/8–18 | 1/2–14 | 3/4–14 | 1–11-1/2 | 1-1/4–11-1/2 | 1-1/2–11-1/2 | 2–11-1/2 | 2-1/2–8 | 3–8 | |||||
| NPSM Swivel Thread | 1/8–27 | 1/4–18 | 3/8–18 | 1/2–14 | 3/4–14 | 1–11-1/2 | 1-1/4–11-1/2 | 1-1/2–11-1/2 | 2–11-1/2 | |||||||
| JIC 37° Flare Thread | 5/16–24 | 3/8–24 | 7/16–20 | 1/2–20 | 9/16–18 | 3/4–16 | 7/8–14 | 1-1/16–12 | 1-3/16–12 | 1-5/16–12 | 1-5/8–12 | 1-7/8–12 | 2-1/2–12 | 3–12 | 3-1/2–12 | |
| SAE 45° Flare Thread | 5/16–24 | 3/8–24 | 7/16–20 | 1/2–20 | 5/8–18 | 11/16–16 | 3/4–16 | 7/8–14 | 1-1/16–14 | |||||||
| SAE O-Ring Thread | 5/16–24 | 3/8–24 | 7/16–20 | 1/2–20 | 9/16–18 | 3/4–16 | 7/8–14 | 1-1/16–12 | 1-3/16–12 | 1-5/16–12 | 1-5/8–12 | 1-7/8–12 | 2-1/2–12 | |||
| Flat-Face Thread | 9/16–18 | 11/16–16 | 13/16–16 | 1–14 | 1-3/16–12 | 1-7/16–12 | 1-11/16–12 | 2–12 | ||||||||
| Inverted Flare Thread | 5/16–28 | 3/8–24 | 7/16–24 | 1/2–20 | 5/8–18 | 11/16–18 | 3/4–18 | 7/8–18 | 1/16–16 | |||||||
| Compression Thread | 5/16–24 | 3/8–24 | 7/16–24 | 1/2–24 | 9/16–24 | 5/8–24 | 11/16–20 | 13/16–18 | 1–18 | |||||||
| Code 61 Flange Head O.D. | 1.19 | 1.34 | 1.50 | 1.75 | 2.00 | 2.38 | 2.81 | 3.31 | 4.00 | |||||||
| Code 62 Flange Head O.D. | 1.25 | 1.62 | 1.88 | 2.12 | 2.50 | 3.12 | ||||||||||
| BSPP Thread | 1/8–28 | 1/4–19 | 3/8–19 | 1/2–14 | 5/8–14 | 3/4–14 | 1–11 | 1-1/4–11 | 1-1/2–11 | 2–11 | ||||||
| BSPT Thread | 1/8–28 | 1/4–19 | 3/8–19 | 1/2–14 | 5/8–14 | 3/4–14 | 1–11 | 1-1/4–11 | 1-1/2–11 | 2–11 | ||||||
| Japanese Pipe Tapered Thread | 1/8–28 | 1/4–19 | 3/8–19 | 1/2–14 | 5/8–14 | 3/4–14 | 1–11 | 1-1/4–11 | 1-1/2–11 | 2–11 | ||||||
| Japanese Flare Thread | 1/8–28 | 1/4–19 | 3/8–19 | 1/2–14 | 5/8–14 | 3/4–14 | 1–11 | 1-1/4–11 | 1-1/2–11 | 2–11 | ||||||
| Copper/Nylon Air Brake Thread | 7/16–24 | 17/32–24 | 11/16–20 | 13/16–18 | 1–18 |
| METRIC (mm) | 8 | 10 | 12 | 14 | 16 | 18 | 20 | 22 | 24 | 26 | 30 | 33 | 36 | 42 | 45 | 52 |
|---|---|---|---|---|---|---|---|---|---|---|---|---|---|---|---|---|
| Whitworth | 8X1.0 | 10X1.0 | 12X1.5 | 16X1.5 | 18X1.5 | 22X1.5 | ||||||||||
| MDL | M12X1.5 | M14X1.5 | M16X1.5 | M18X1.5 | M22X1.5 | M26X1.5 | M30X2.0 | M36X2.0 | M45X2.0 | M52X2.0 | ||||||
| MDH | M16X1.5 | M18X1.5 | M20X1.5 | M24X1.5 | M30X2.0 | M36X2.0 | M42X2.0 | M45X2.0 | M52X2.0 | |||||||
| Komatsu | M18X1.5 | M22X1.5 | M24X1.5 | M30X1.5 | M33X1.5 | M36X1.5 | M42X1.5 | |||||||||
| French | M20X1.5 | M24X1.5 | M30X1.5 | M36X1.5 | M45X1.5 | M52X1.5 |